Elgon
TIitles of articles added March 2024 are colored red in the footer of the page.
In areas where the density of bee colonies are high it's difficult to just stop treating without loosing many colonies, your own and your neighbours.
You may have difficulties setting up apiaries isolated enough (2 km). You may have many hives.
You may decide to develop resistance in your bees gradually anyhow.
It may be possible whatever your situation is. It can maybe take a little longer.
You can find the one or two apiaries most isolated and put only a few colonies in each, to begin with.

I decided to go step by step and went forward learning more and more. You can find my experiences in several articles on this website.
Gradual resistance
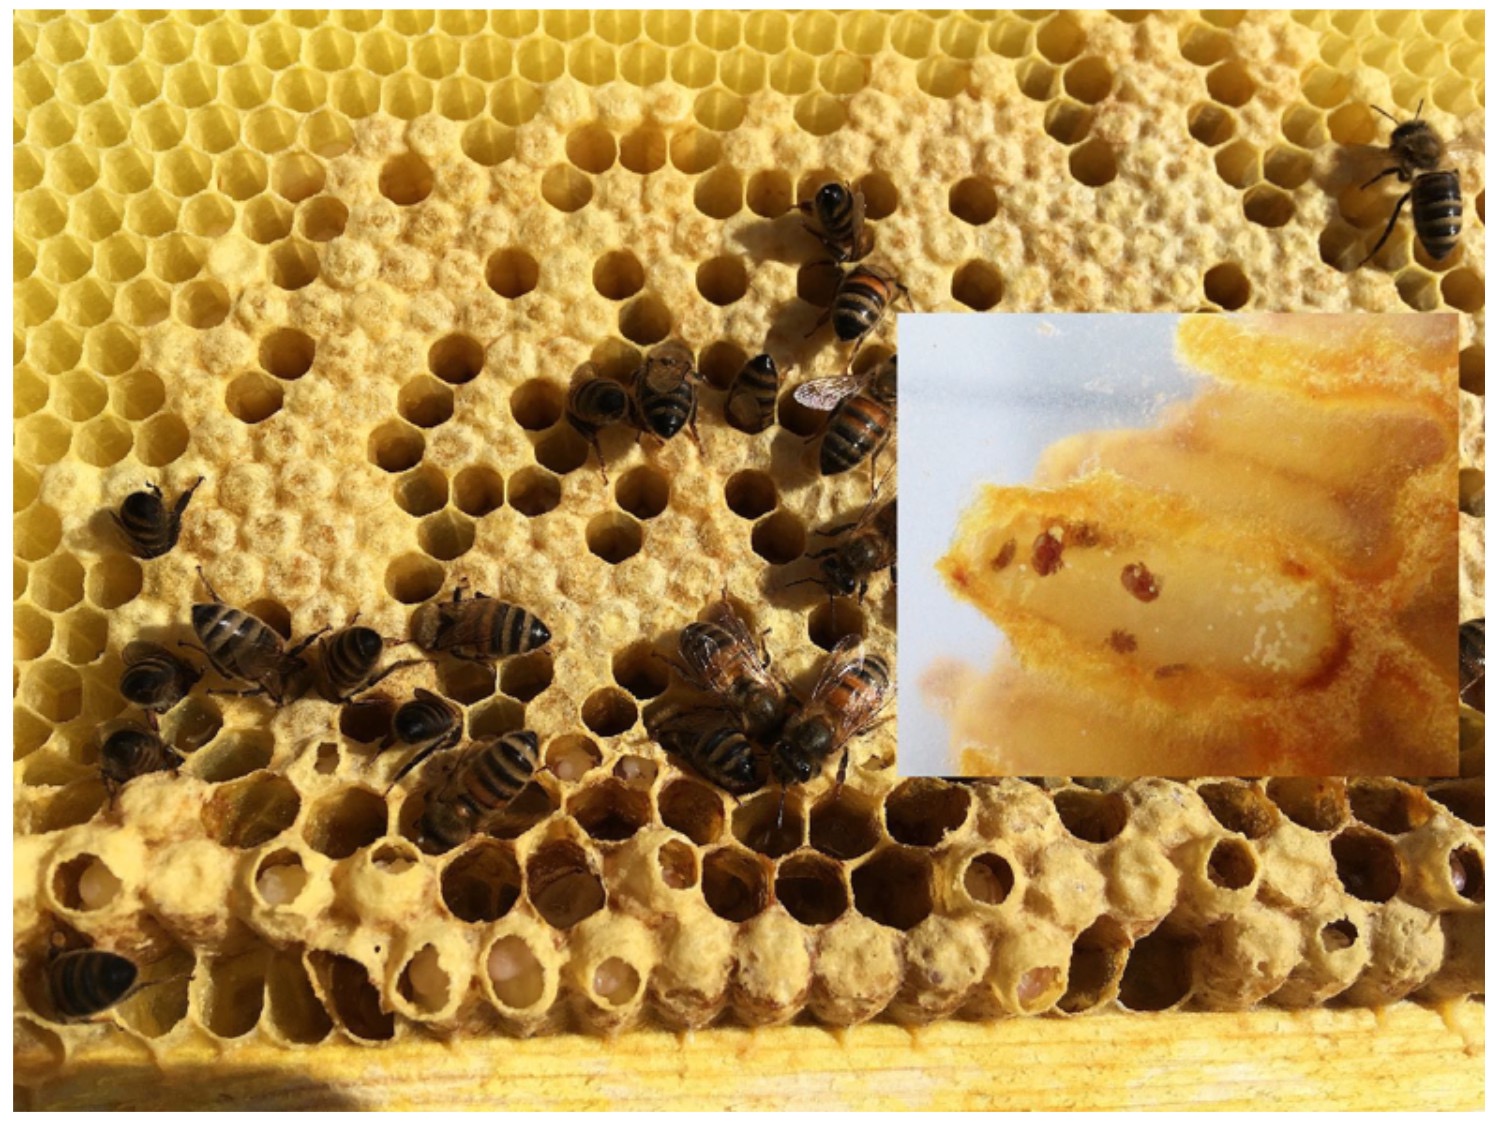
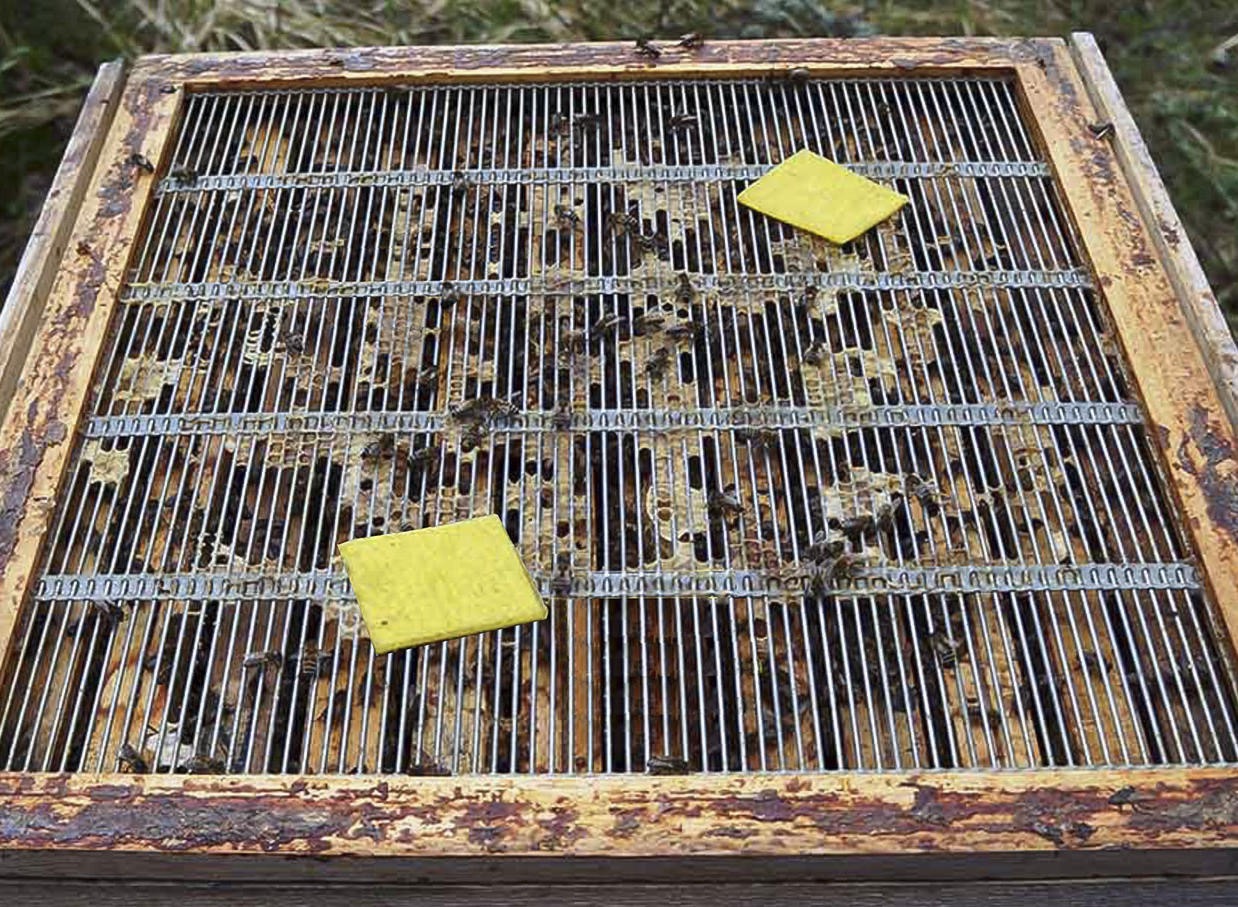
Infected brood opening/removal by the bees. Also drone brood.
No removal of drone brood
I have never used removal of drone brood. There are several reasons for that.
It would take too much work. Added to all the types of work involved in beekeeping and bee breeding.

Without drone brood removal by the beekeeper, bees will increase the trait of identifying mites in drone brood and do something about this, as they are doing with mites in worker brood. Thus they are doing the "drone brood removal" without the help of the beekeeper.

The colony need their drones. Many drones with good resistant traits will help increasing resistance in the bees in the whole area – if beekeepers are not constantly requeening with queens from outside the area from places with low resistance.
The least bad chemical
The first to decide is what to use to fight the mite. After you have decided to go stepwise to go treatment free.

Synthetic chemicals leave residues in honey and especially in wax, residues that build up in wax to higher and higher levels. It can be degraded. But the daughter substances after degradation can be as toxic as the mother substance.

Organic acids you have to protect yourself even more when using, with respiratory protection and acid-proof gloves. The residues are very low.

Essential oils are in essence organic and harmless for man, used as spice (flavouring) in different products and as a preservative. Above all, you can use it whenever needed. Interesting:
When you make the agents for using it, for example thymol pads, you avoid strong fumes that can occur. You can find higher than threshold residues of thymol during treatment in honey and maybe a week thereafter, that gives an extra taste of thyme. There is no threshold for thymol in food as it is not dangerous for our health. Essential oils are highly volatile. That's the way they work. The residues quickly leave after removal of the treatment pads.
The best way to decrease thymol in wax (thymol is fat soluble) is to keep thymol smelling combs in the bee colony where the ventilation quite quickly remove it.

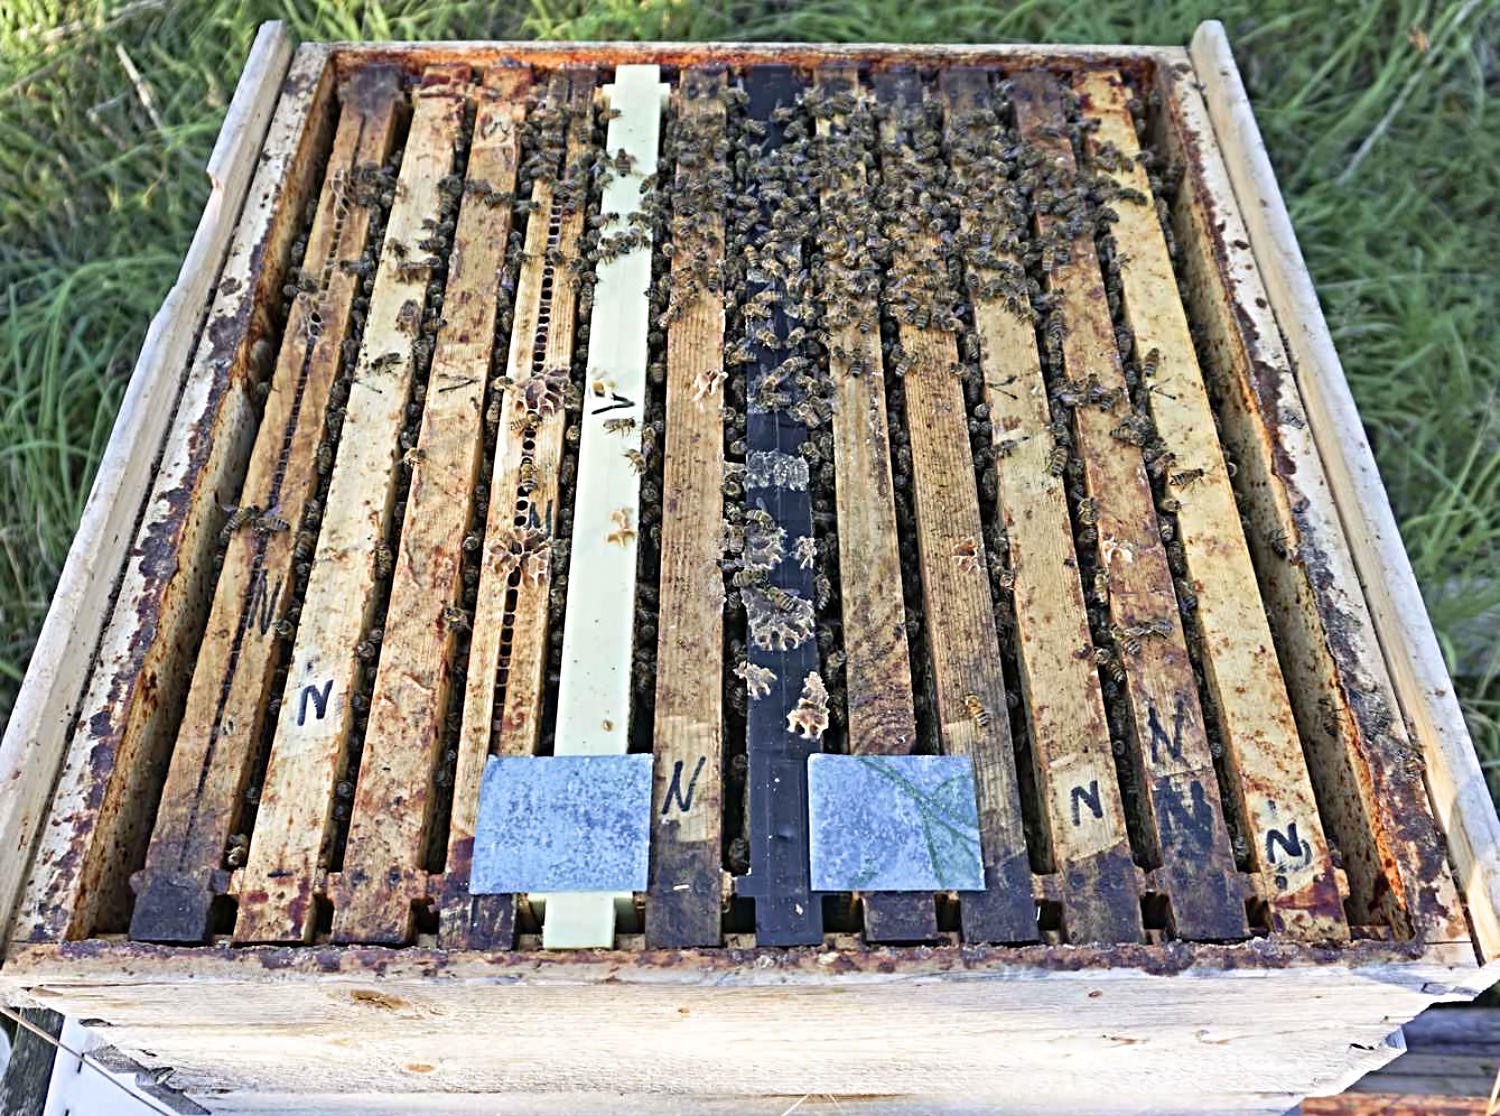
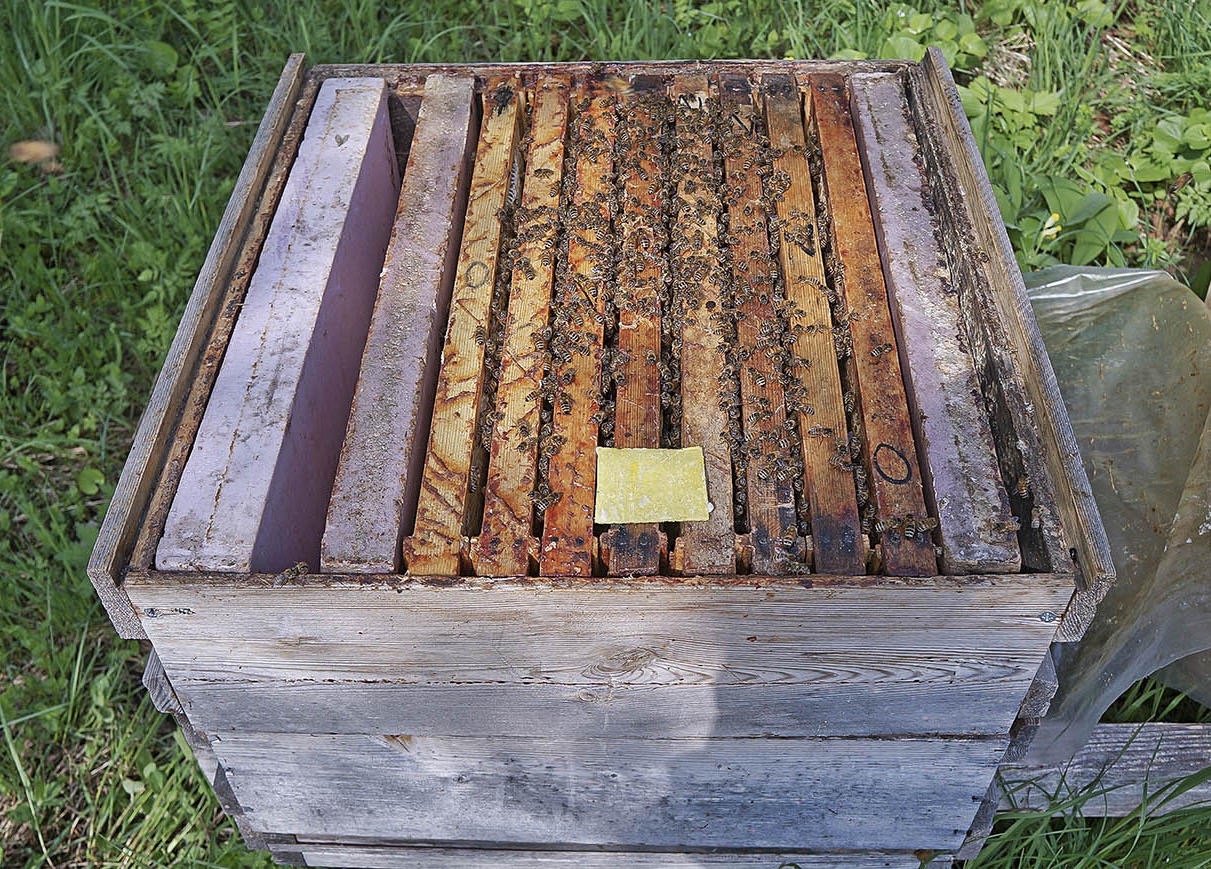
My choice was thymol (somewhat still). It works marvelous, easy and quick, from spring to autumn. You adjust the amount used when treating, according to the outside temperature to get a good enough evaporation but not too much (when it's hot). For a good result there should be brood present in the colony.

When it's hot you use smaller amount but instead repeat the treatment more often to cover an entire brood period of three weeks. Similar commercial products to these homemade pads are ApiLife Var and Thymovar.
Don't forget and don't fool yourself. Also essential oils in high doses kill microbes in the microbiome.
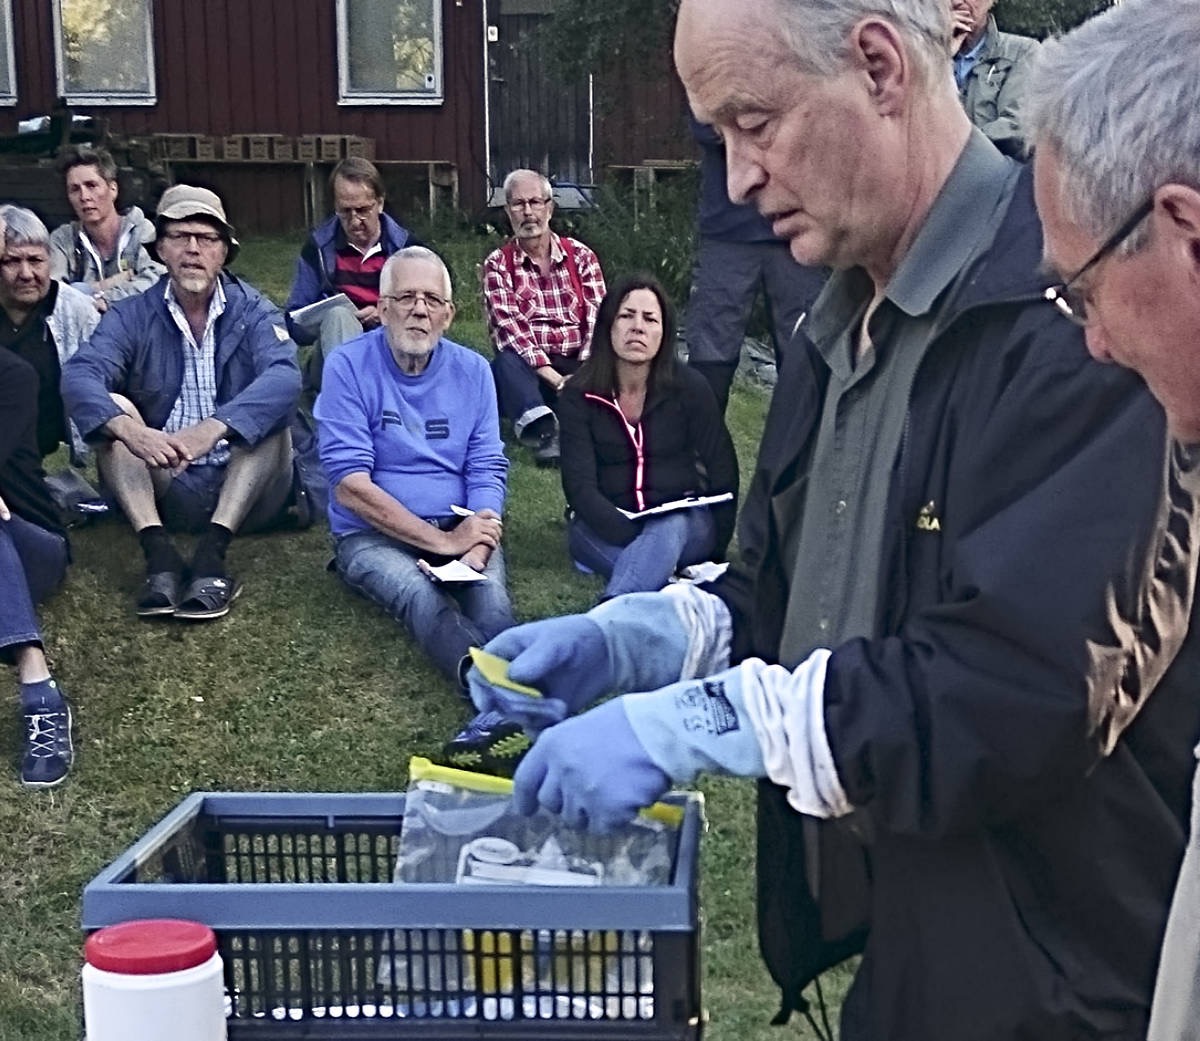
Recipe for thymol pads
• 125 gram thymol crystals
• ≤ 1.5 centiliter (≤0.5 ounce) technical alcohol

The alcohol is used to lower the melting point. Thus avoiding too much smelling of thymol fumes.
This amount of thymol and alcohol gives about 24 thymol pads.
Each pad will hold somewhat more than 5 grams of thymol.

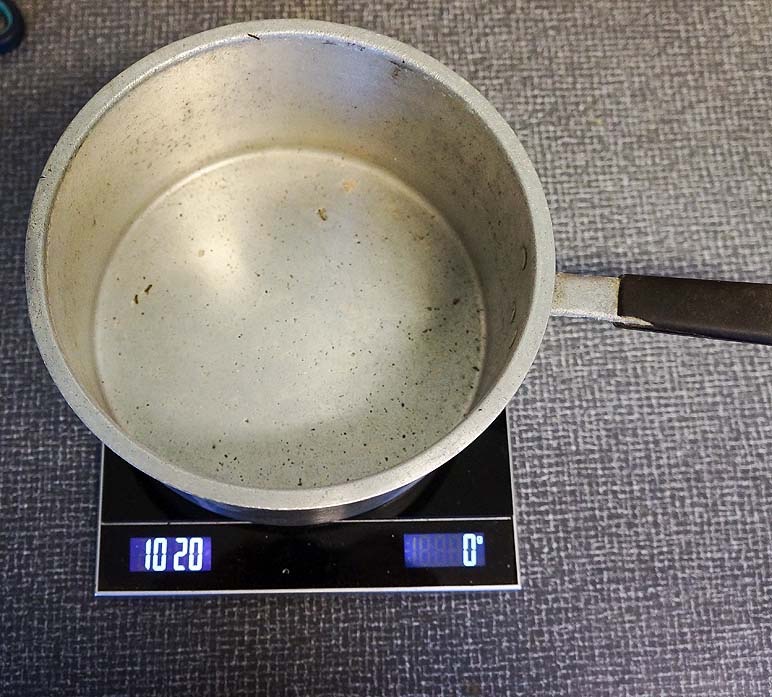
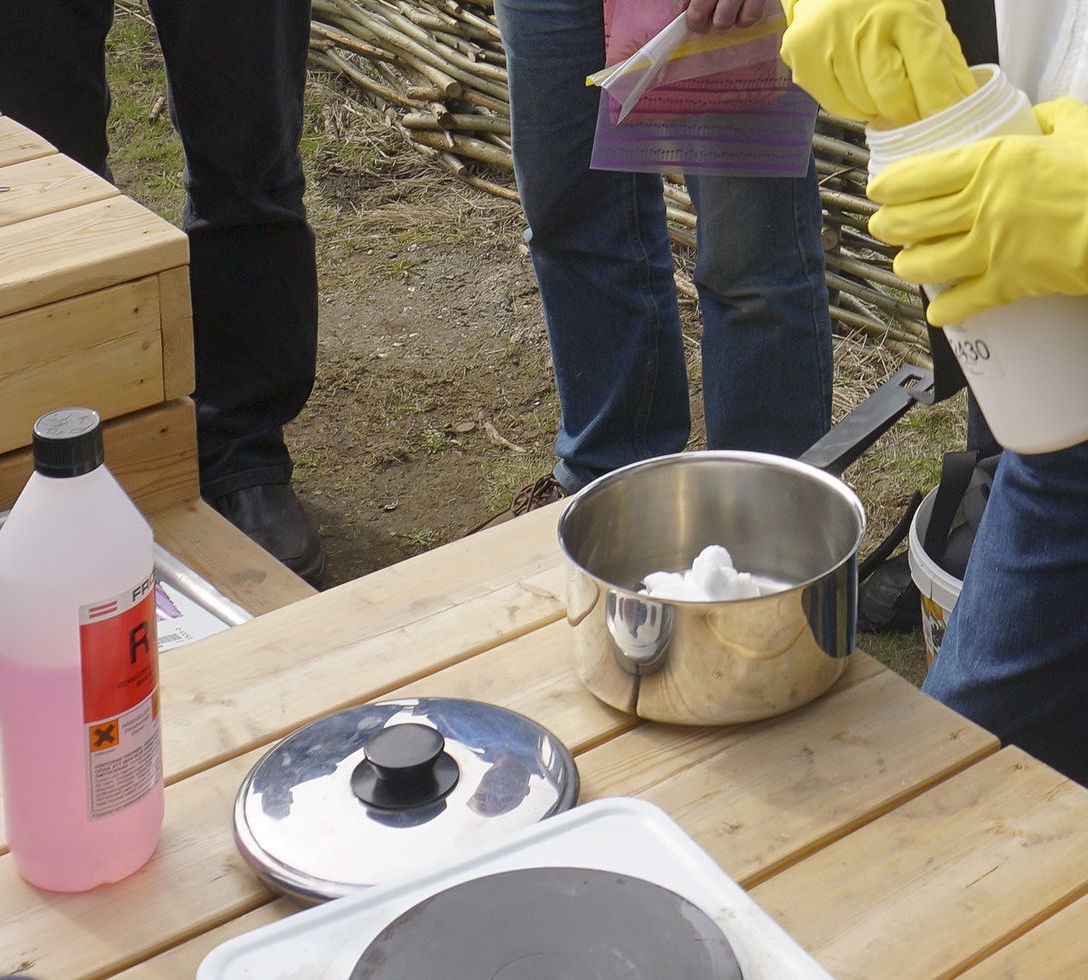
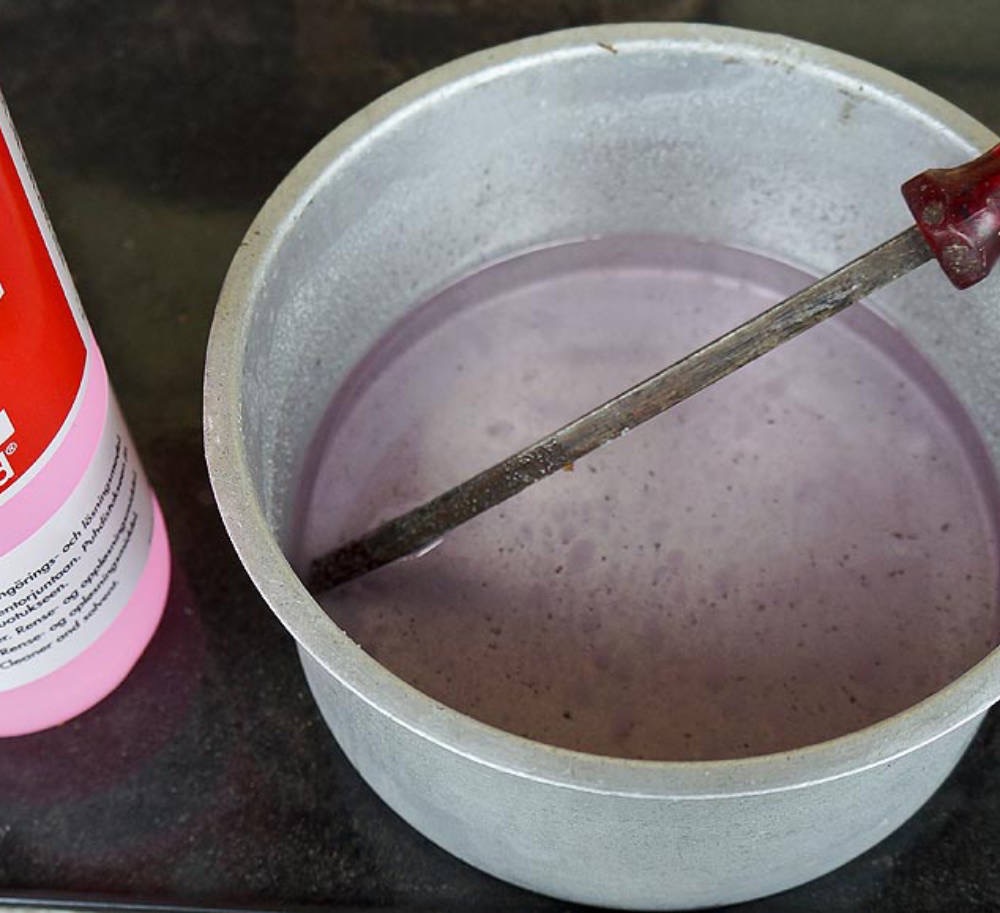
Warm in a saucepan on a hob outside (for quick removal of fumes) until you get a clear solution.
Take away the saucepan from the hob and put it on a potholder to avoid the solution to get overheated and thus smell as little as possible.

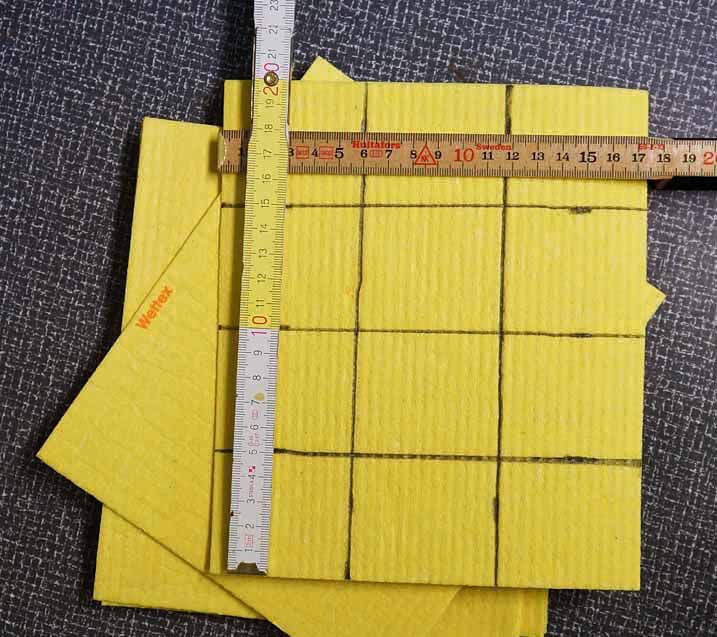
• Dishcloth (cellulose and cotton fiber) 1.5-2 mm think (0.6-0.8 inch)

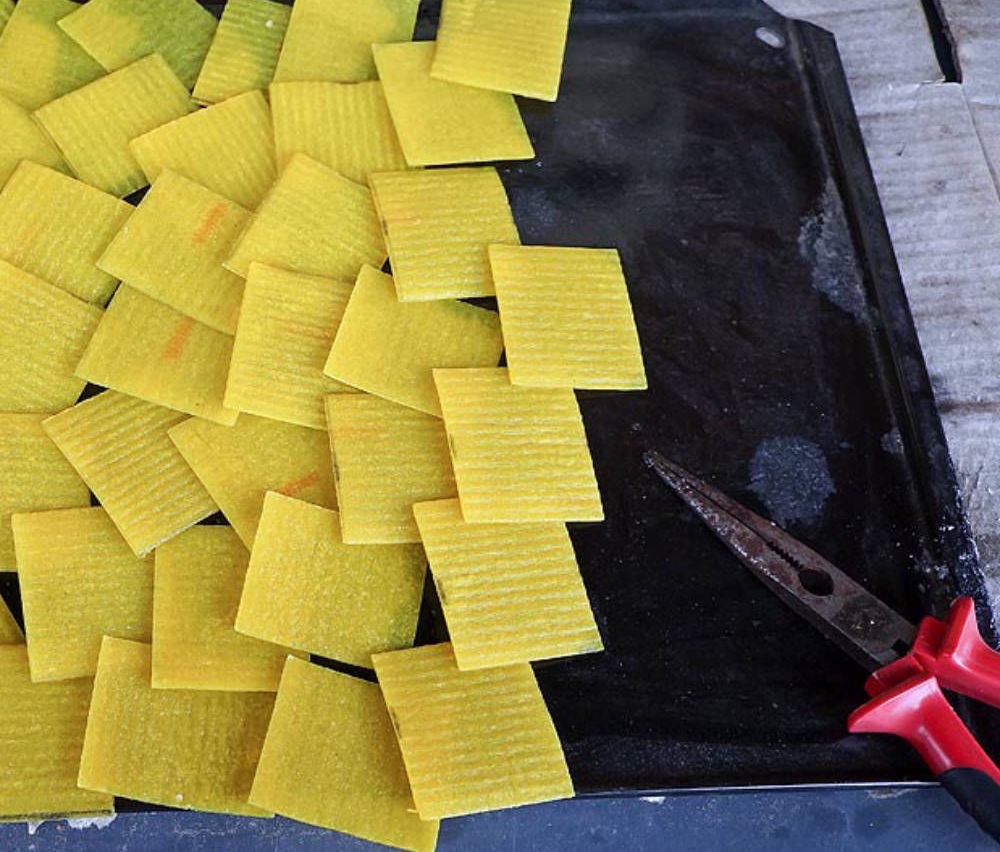
Cut pieces (pads) roughly 5 x 6 cm (2 x 2.3 inch)
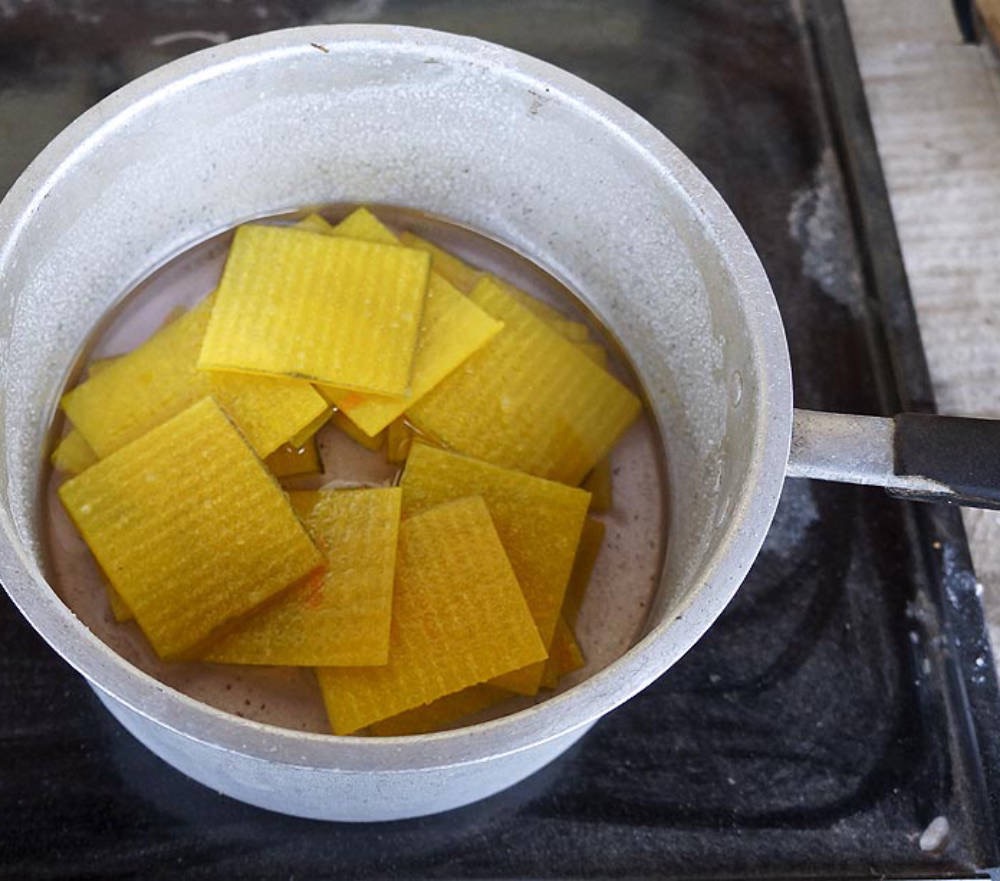
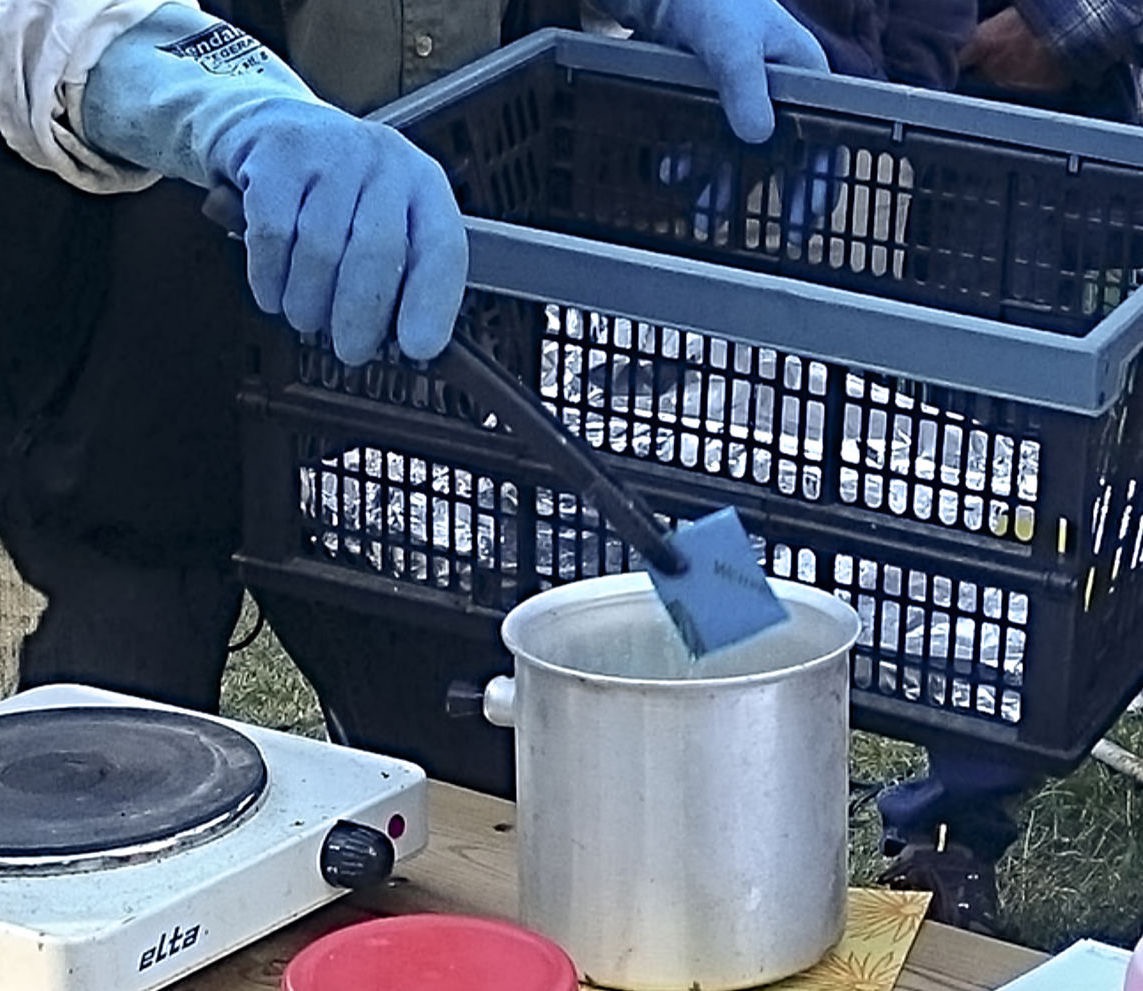
Put dishcloth pieces into the thymol solution until they are saturated.
Take them up piece by piece with a plier and put them on a plate for cooling somewhat.
Put about 24 of them in a zip lock plastic bag.
It's ok if the thymol pads haven't cooled completely.
When they have cooled they have most often hardened.
The thymol solution have become crystals in and on the pads.
Put the plastic bag with thymol pads in a second zip lock bag.
Thus keeping the pads hard and good for use.
Putting them in a third zip lock bag could be a good idea.
Put the zip lock bags in an almost tight plastic box (small tool box).
Keep the box out of the sun.
Bring the box with you into the apiary, ready for use when needed.
1. Dish cloth approx. 1.5 mm thick, 200 x 175 mm large, is cut into 12 pieces, about 58 x 50 mm in size. If you use 125 grams of thymol for a lot, you need more than 2 wettex discs of 200 x 175 mm. You get about 25 pieces with about 5 grams of thymol.
2. A digital scale that can be reset, including the weight of a small saucepan, so you directly get the weight of the thymol crystals when you pour them into the saucepan.
3. After filling up with the desired amount of thymol crystals, pour into a very small amount of rubbing alcohol (technical alcohol), a pair of capsules, to 125 grams of thymol.
4. Heat it a bit, not much, stir it a little until you have a clear solution. You can remove the pan from the cooktop to avoid excessive warming and harsh odors.
5. Then pour in almost all 25 pieces (if you used 125 g crystals). Take some kind of pliers and dip a piece at a time to make it completely wet and let it drop off somewhat.
6. Then place the pieces on a plate or similar to dry and cool off a little.
7. A baking tray or the like works well.
8. Even before the wet pieces have dried completely from the alcohol and got hard, when they are still somewhat wet and soft, they can be placed (15-20 pcs) in a plastic bag with plastic zipper. Then put it in a second similar plastic ziplock bag. Then these bags are put in for example a plastic toolbox. It can be brought along ready for use when working the bees.
Suggestions when using thymol pads
You don't want the concentration of fumes too high in the hive so that it affects egg laying, brood and microbiome too much. That's why I don't recommend more than 2 pads at a time of the type here described.

You want a high enough concentration of thymol fumes in the hive. Shut eventual extra entrance holes in supers.
Cover a big bottom netting if such is used.
Use if possible a small entrance.

Treating when temperature is at the lower end of the interval, put the pads on top of an excluder with a wooden rim (it enhances the evaporation) that is placed on top of the top brood box.

You can use thymol when supers are on the hive. Thymol leaves honey enough much, (the honey still in the hive) after a couple of weeks after removal of the pads. If possible treat in beginning and end of season. Thymol goes mainly into wax and leaves it again if eventual smelling combs are kept in hives for ventilation away of thymol.
1. If the colony is strong and it's middle of or late in season it gets two pads. They can be placed above a queen excluder avoiding the center somewhat. A reason for treatment could be a varroa level above 3%. In spring even a strong colony gets only one piece not to lower brood production. After 10 days the treatment is repeated and after another 10 days removed. The thymol fumes are better ventilated with the increased space that this excluder is creating. In hot weather use half the normal treatment and replace the pieces more often, with the total treatment time being three weeks.
2. In the case of sugar feeding at the same time as treating, in preparing for winter in August, the two pads can be placed far from the entrance up to the sugar solution in the feeder. In this case this entrance is on the farther side of the hive. Therefore the pads are placed on the opposite side on the top bars between comb gates. Bees can avoid going up to the sugar solution if the tymol pads are placed right at this entrance. 10 days later, the pieces are replaced by the same number. After a another 10 days, these pieces are removed and treatment ends.
1. A weaker colony gets one thymol pad between the middle top bars towards the back, to avoid getting close to the brood that can be close to the top of the middle of the cluster. If it's weak in spring it may be due to viruses because of a high varroa infestation, or that the colony had a tough winter because it wasn't so strong in autumn.
After 10 days the thymol pad is replaced with a new. After another 10 days this piece is also removed.
1. With normal and strong colonies
• 15-25 C (60-77 F) – 2 thymol pads (10 gram). Place obliquely in a straight line with the center in the middle and about 7 cm (2-3 inch) from the outer walls of the bee box. Replace after 10 days. Remove altogether after a total of 3 weeks.

• 25-35 C (77-95 F) – 1.5 thymol pad (7-8 gram). Replace twice after 7 days each.

• 35 C ≤ – 1 thymol pad (split in two) (5 gram). Replace three times after 5 days each.
2. When feeding sugar solution with a top feeder
Place thymol pads at one end 5 cm from the edges of the top lists, about 10 cm (4 inches) from each other.
The entrance to the top feeder is at the other end of the toplists.
The reason is bees avoid the thymol fumes and may not reach the feeding solution if placed otherwise.
3. With a weaker colony
• 15-25 C (60-77 F) – 1 thymol pads (5 gram). Place in the middle of the frames at one end of the top lists about 7 cm (2-3 inch) from the outer wall of the bee box. Replace after 10 days. Remove altogether after a total of 3 weeks.

• 25-35 C (77-95 F) – 3/4 thymol pad (4 gram). Replace twice after 7 days each.

• 35 C ≤ – 0.5 thymol pad (3 gram). Replace three times after 5 days each.
Suggestions when using thymol pads
The pads should be soft when replaced. If they are still hard or somewhat hard, there are still thymol left in them that you expected to have been evaporated. If so, let those pads remain in the colony when placing another round.